Table of contents
Statische Route im Router hinzufügen (Bsp. Netgear PR460X)
Statische Route im Router hinzufügen (Bsp. Fritzbox 7590)
Standard-Gateway auf dem Kontrollsystem einstellen
Lokale Route auf einem Windows-PC festlegen
Intended use
When setting up a system or troubleshooting, there are some situations where adding a static route to the computer's internal routing table is required:
- If a static route has not yet been added to the network router. Perhaps because one is not required for the daily operation of the system (only switching) or the router does not support the addition of a static route.
- Changing the computer's default gateway to the switch IP would affect the ability to connect the computer to the Internet for Remote Desktop Support.
- The installer must connect to the Internet via the WiFi connection while hardwiring the Just Add Power system if the Just Add Power switch is not connected to the rest of the customer's network.
While adding a static route to a computer can be a great tool for testing and troubleshooting, it does not improve the actual operation of the system because the static route is only tied to the computer to which the route is applied.
Summary
After configuring a JustAddPower system via JADConfig or AMP, a static route must be entered into the system so that control systems can function and the web interfaces of the individual devices can be accessed.
There are 3 common ways to give the data network access to JustAddPower:
- Set a static route on the router so that ALL devices on the data network can communicate with Just Add Power with a single setting.
- Set the default gateway on the control system processor so that the control system can communicate with Just Add Power. Other network devices will not have access to Just Add Power.
- Set a local route on a PC so that this PC can temporarily communicate with Just Add Power. This setting is removed when the PC is switched off or restarted.
Just Add Power provides the information required to apply the static route in the report file. However, we cannot do this automatically as we have no control over the router configuration or the control processor settings; a static route must be added manually by the installer.
One of these three methods must be used to control the Just Add Power system. It is not necessary to make more than one setting.
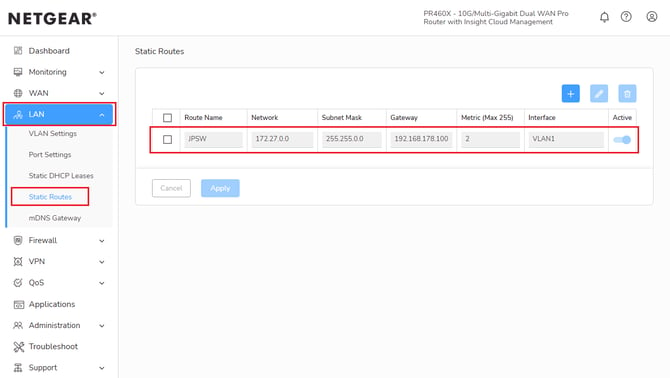
Add static route in the router (E.g. Netgear PR460X)
This option is best suited for most systems. It enables every device in the network to access Just Add Power via a single router setting.
1. Locate the report file for the system that AMP or JADConfig has created. In the upper part of the document you will find the information on the static route.

3. Select the “LAN” tab on the left-hand side and then the “Static Routes” subsection.
4. Use the blue plus button to add a new static route and enter route information:
- "Route Name" is the name for the route that describes its purpose.
- Enter the value for the target IP from the report file under “Network”.
- Enter the value for the netmask from the report file.
- Enter the gateway from the report file. This is the IP address of the Just Add Power switch.
- Leave Metric blank unless otherwise specified or enter 2.
- Leave the VLAN at 1 .
- Activate the route by clicking on "Apply".
Add static route in the router (E.g. Fritzbox 7590)
Follow the instructions from above to step 2
3. Select the Home network tab on the left-hand side, then the Network subsection and then open the network settings.

4. Scroll to the bottom of the page and click on the additional settings.
5. Scroll to the bottom of the page again and open IPv4 Routes under the Static Routing Table section.
6. You can now add a new IPv4 route.
7. You can place in the Static IPv4 route section:
- Enter the target IP value from the report file in the IPv4 network.
- Enter the netmask value from the report file in the subnet mask.
- Enter the gateway from the report file. This is the IP address of the Just Add Power switch.
- Activate the route with the tick.
- Click OK to add the route.

8. Activate the route with Apply.
Standard-Set gateway on the control system
This option is best suited for systems where the router does not support static routing. If you are concerned that unsecured devices may have access to Just Add Power, this option is the best.
1. Locate the report file for the system. In the upper part of the document you will find the information for the static route. The only value required for this method is the gateway, i.e. the IP address of the Just Add Power switch.
2. Open the network settings of the control system. RTI is used in this example, but all control systems have this option.
3. Set the processor of the control system to static IP settings:
- The IP address must be an IP address available in the network that is not in the DHCP range.
- The subnet mask must match the subnet mask of the entire network.
- The gateway must be the IP address of the Just Add Power switch. In the example 192.168.0.11.
- DNS server can either be the router IP (192.168.0.1) or Google DNS (8.8.8.8).
4. With these settings, the control system processor can access both the Internet and Just Add Power.

Lokal route on a Windows PC
This option is best suited for troubleshooting Just Add Power when there is no static route. It allows temporary access to Just Add Power on a single PC, but is removed again after shutdown.
Command:
Executed from a Windows “Run as administrator” prompt.
route add [destination network] mask [netmask] [switch ip] metric 2
Example of a standard configuration with AMP:
route add 172.27.0.0 mask 255.255.0.0 192.168.0.11 metric 2
